
How to Frame Antique Paper Prints: A Step-by-Step Guide
Table of Contents
- Why Proper Framing Matters for Antique Paper Prints
- Step 1: Assess Your Print's Condition and Authenticity
- Step 2: Choose Archival Framing Materials
- Step 3: Prepare Your Print with Proper Hinging and Mounting
- How to Prevent Foxing on Antique Prints
- Risks of Storing Antique Prints in Basements
- Step 4: Frame Assembly and Display Setup
- Common Mistakes to Avoid When Framing Antique Prints
- Frequently Asked Questions
Last Updated: September 30, 2026
Why Proper Framing Matters for Antique Paper Prints
Antique paper prints are vulnerable to light, moisture, and temperature fluctuations. Without proper protection when you frame antique paper prints, they fade, yellow, and deteriorate. The good news: correct framing stops this damage before it starts.
Correct framing protects artwork from environmental harm, preserves investment value, and displays it beautifully for decades.
Most people prioritise aesthetics over protection. The print looks great for two years, then foxing appears, colours shift, and paper becomes brittle.
This guide covers assessing condition, choosing archival materials, safe mounting, and protecting against foxing and improper storage, everything needed to frame antique paper prints for generations.
Step 1: Assess Your Print's Condition and Authenticity
Before framing, assess your print's condition, as poor condition requires different handling than excellent shape.
Start by examining the print under good lighting. Look for these signs of damage:
- Foxing: Brown or yellow spots scattered across the paper
- Staining: Water marks, discolouration, or uneven patches
- Tears or creases: Physical damage to the paper itself
- Brittleness: Paper that cracks or breaks when gently flexed
- Fading: Colours that appear washed out or uneven
Prints with significant damage, deep stains, large tears, or severe brittleness should be professionally restored before framing.
Prints in good condition can proceed to framing, which will protect them and prevent further deterioration.
Check authenticity by examining paper texture, printing technique marks, signatures, and watermarks. Reputable sources like Antiquarian Print Shop provide authentication.
Step 2: Choose Archival Framing Materials
Most people buy cheap materials and watch prints deteriorate. Archival materials cost more upfront but last for generations.
The key principle: use only materials that won't damage the print. This means acid-free, lignin-free, and pH-neutral everything.
Acid-Free Mat Board and Backing
Mat board surrounds your print and creates space between it and glass. Cheap mat board contains acid and lignin that migrate into the paper, causing yellowing and brittleness. Use only acid-free, lignin-free "museum quality" or "conservation-grade" boards with pH 7 or higher.
Buffered mat board contains calcium carbonate to neutralise environmental acids. Use buffered board for most antique prints; unbuffered only for acidic or extremely delicate prints.
The backing board, also acid-free and lignin-free, protects the print's back from dust, insects, and humidity changes.
UV-Filtering Glass and Museum Glass Options
Glass protects the print from dust and physical damage. But regular glass lets ultraviolet light through, which fades colours and weakens paper fibres.
UV-filtering glass blocks 99% of ultraviolet rays at minimal extra cost, allowing prints to retain colours for decades instead of fading in years.
Museum glass blocks ultraviolet and infrared light, offers superior clarity, and reduces glare. At two to three times the cost of UV-filtering glass, it's the gold standard for valuable or rare prints.
For reproductions and prints with moderate value, UV-filtering glass is sufficient. For original antique prints or pieces you plan to keep for generations, museum glass is worth the investment.
Step 3: Prepare Your Print with Proper Hinging and Mounting
How you attach the print to the mat determines whether it survives framing. Use reversible mounting methods only, allowing removal without permanent marks or damage.
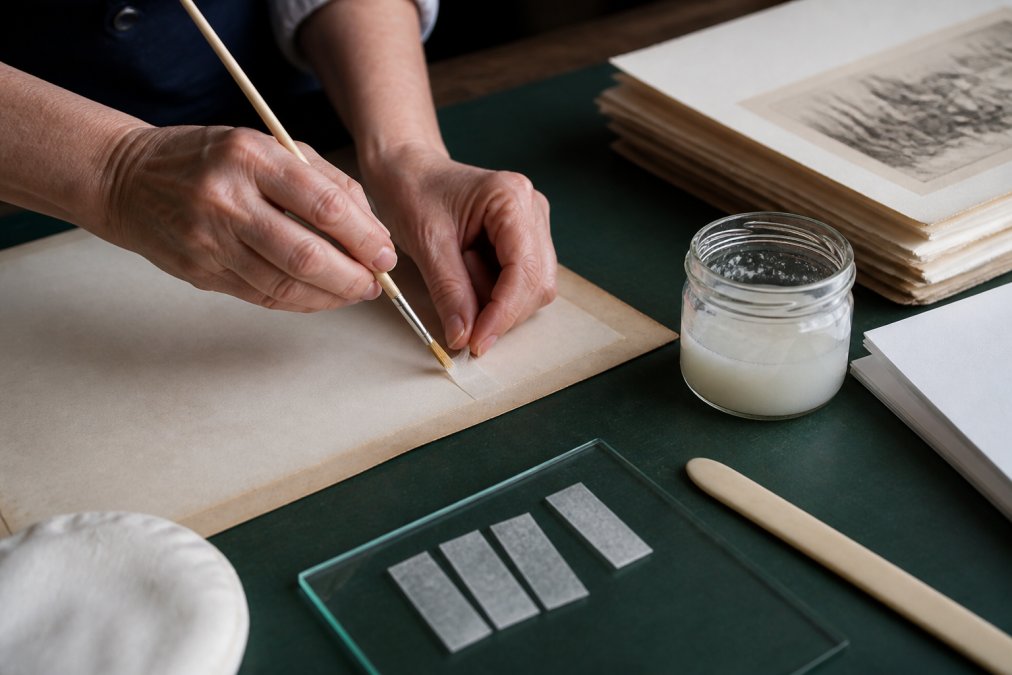
Hinging is the preferred method for valuable prints. Attach the print using small strips of Japanese paper and wheat starch paste without adhesive touching the front. Cut 2cm × 4cm strips of Japanese paper, mix wheat starch paste to peanut butter consistency, apply along the print's top back edge, press half the hinge on the print and half on the mat, repeat on the other side, and let dry 24 hours.
Wheat starch paste is reversible, dampen and peel hinges away without harming the paper if needed.
Mounting corners are small paper pockets holding the print's corners without adhesive, faster than hinging but slightly less secure.
Portrait of The Honourable Sir Robert →
Never use tape, glue, or adhesive directly on the print. These methods are permanent and will damage the paper when you try to remove them.
How to Prevent Foxing on Antique Prints
Foxing, brown or yellow spotting caused by iron particles reacting with moisture and oxygen, is permanent once it appears. Prevention focuses on stopping it from spreading.
The prevention strategy has three parts: control humidity, block light, and use acid-free materials.
Humidity control is most important. Foxing accelerates above 60% or below 30% humidity. Keep prints between 40-50% relative humidity using a hygrometer to monitor and a dehumidifier or humidifier to adjust.
Light exposure matters, ultraviolet light weakens paper and accelerates foxing. Use UV-filtering glass and keep prints away from direct sunlight.
Acid-free materials prevent new foxing. Acid in mat board, backing, or adhesives migrates into paper and reacts with moisture to create foxing. Conservation-grade materials stop this before it starts.
Minor foxing won't spread with proper framing. Professional restoration can lighten it but is expensive and unnecessary if the print is stable.
Risks of Storing Antique Prints in Basements
Many people store valuable prints in basements to save space. This is one of the worst decisions you can make for antique paper preservation.
Basements are humid, flood-prone, have temperature swings, attract pests, and create mould conditions despite being dark.
Humidity in basements typically ranges 60-80%, well above the ideal 40-50%. High humidity accelerates foxing, encourages mould, and makes paper brittle.
Temperature fluctuations cause paper to expand and contract, stressing fibres and causing cracking and warping.
Mould and mildew thrive in basements and cause permanent damage, eating through fibres and leaving indelible stains.
Pests attracted to basements eat paper and shred prints. Damage spreads quickly once they find your collection.
Store prints temporarily in climate-controlled closets or interior rooms in acid-free boxes, away from direct light, with stable temperature. Check every few months for damage.
Better yet: frame your best prints and hang them where you can enjoy them. Framed prints in a living space are protected, displayed, and appreciated. That's what antique prints deserve.
Step 4: Frame Assembly and Display Setup
Once your print is mounted and your materials are chosen, assembly is straightforward. The key is working carefully and keeping everything clean.
Here's the order of assembly from back to front:
- Backing board, acid-free, lignin-free board that sits behind everything
- Mounted print, your print with hinges or mounting corners attached to the mat
- Mat board, the acid-free board with the window cut out to frame the print
- Glass or museum glass, UV-filtering or museum-quality glass
- Frame, your chosen frame, which holds everything together
Clean glass thoroughly before assembly, dust and fingerprints are permanent. Use soft cloth and cleaner; never touch with bare fingers.
| Assembly Component | Material Standard | Purpose |
|---|---|---|
| Backing Board | Acid-free, lignin-free | Protects print back from dust and moisture |
| Mat Board | Conservation-grade, buffered | Frames print and prevents contact with glass |
| Glass | UV-filtering or museum | Protects from dust and light damage |
| Hinges/Corners | Japanese paper + wheat starch paste | Reversible mounting that won't damage print |
| Frame | Wood or metal | Holds all components and allows hanging |
Common Mistakes to Avoid When Framing Antique Prints
Most damage to antique prints happens during framing, not during display. Knowing what to avoid saves your print.
Frequently Asked Questions
Can you frame a paper print without damaging it?
Yes, when you frame antique paper prints using archival-quality materials and reversible mounting techniques. The key is avoiding direct contact between the print and glass using acid-free mat board, selecting pH-neutral hinges made from Japanese paper, and choosing UV-filtering glass to protect against light damage. Never use standard adhesive tape, rubber cement, or wood-pulp mat board, as these introduce acids that degrade paper over time. Proper spacing through the rabbet and spacers ensures air circulation and prevents moisture trapping.
What materials are required for archival framing of antique prints?
Essential archival framing materials include acid-free, lignin-free mat board; UV-filtering or museum-quality glass; conservation-grade backing board; wheat starch paste or Japanese paper hinges for reversible mounting; and pH-neutral framing hardware. The frame itself should be constructed from stable wood or metal that won't warp. All components must be lignin-free to prevent acid migration that causes foxing and deterioration. Using these materials preserves the print's condition and longevity.
How does UV-filtering glass protect antique paper prints?
UV-filtering glass blocks ultraviolet radiation that fades inks and discolours paper fibres. Standard glass offers no UV protection; museum-quality glass filters 99% of UV rays while maintaining image clarity. This is especially critical for antique prints exposed to natural light, as UV damage is cumulative and irreversible. The glazing also protects against dust, moisture, and physical contact. If your print is in a high-light area or near windows, UV-filtering glass is essential for long-term preservation and colour retention.
Is it safe to use standard adhesive tape on antique paper?
No. Standard adhesive tape, masking tape, and rubber cement are never suitable for antique prints because they contain acids and leave permanent residue. Even "archival" pressure-sensitive tape can fail over time and damage the paper substrate. Instead, use reversible hinging with Japanese paper hinges and wheat starch paste, which allow the print to be safely removed without harm. If the print is already taped, consult a conservator before attempting removal, as improper removal can tear the paper.