
How to Spot Age in Antique Copperplate Engravings
Quick Summary
The most reliable signs of age in antique copperplate engravings are the physical traits of how the sheet was made, not its look. Check for a raised plate mark, handmade laid paper with chain lines and watermarks, and even, edge-weighted toning. Hand-cut line quality and matching publication details then confirm the date.
- Hold the sheet at a low angle under a lamp to see whether the plate mark is raised and slightly uneven.
- Look for laid lines, chain lines and a watermark by holding the paper up to light.
- Even, edge-weighted toning suggests genuine age, while blotchy stains or tidelines suggest artificial aging.
- Use a handheld UV torch: many modern papers fluoresce blue-white while old rag paper stays dull.
- Treat wear as evidence of use, not proof of age, and never trim, wash or repair the sheet yourself.
Table of Contents
- Seven Signs of Age in an Antique Copperplate Engraving
- Sign 1: The Plate Mark and Plate Impression
- Sign 2: Handmade Paper, Laid Lines and Watermarks
- Sign 3: Age Toning, Foxing and Discoloration
- Sign 4: Engraved Line Quality and Fine Crosshatching
- Sign 5: Margin Wear, Creases and Brittleness
- Sign 6: Ink, Hand Colouring and Printing Style
- Sign 7: Publication Details and Dating Clues
- Putting the Seven Signs Together
- Frequently Asked Questions
Seven Signs of Age in an Antique Copperplate Engraving
Last Updated: November 12, 2026
Telling a genuinely old copperplate engraving from a later reproduction is one of the most useful skills an antique print buyer can build, and the same skill applies whether you are looking at antique copperplate engravings or modern copies of them. Collectors often ask whether a print is really as old as the seller says, and what in the paper and the plate actually points to age.
This guide walks through seven signs of age in an antique copperplate engraving, from the plate mark to the publication details. For each one, we explain what to look for, what it can and cannot tell you, and where wear or damage might mislead you. The goal is not to give you a magic test but to help you read a print the way an experienced collector does.
Antique copperplate engravings were made by incising lines into a copper plate with a burin, inking the plate, and pressing damp paper against it. The process left a distinctive physical record on every sheet, and that record is what we examine below.
Sign 1: The Plate Mark and Plate Impression
The plate mark is the embossed line left where the edge of the copper plate pressed into the paper.
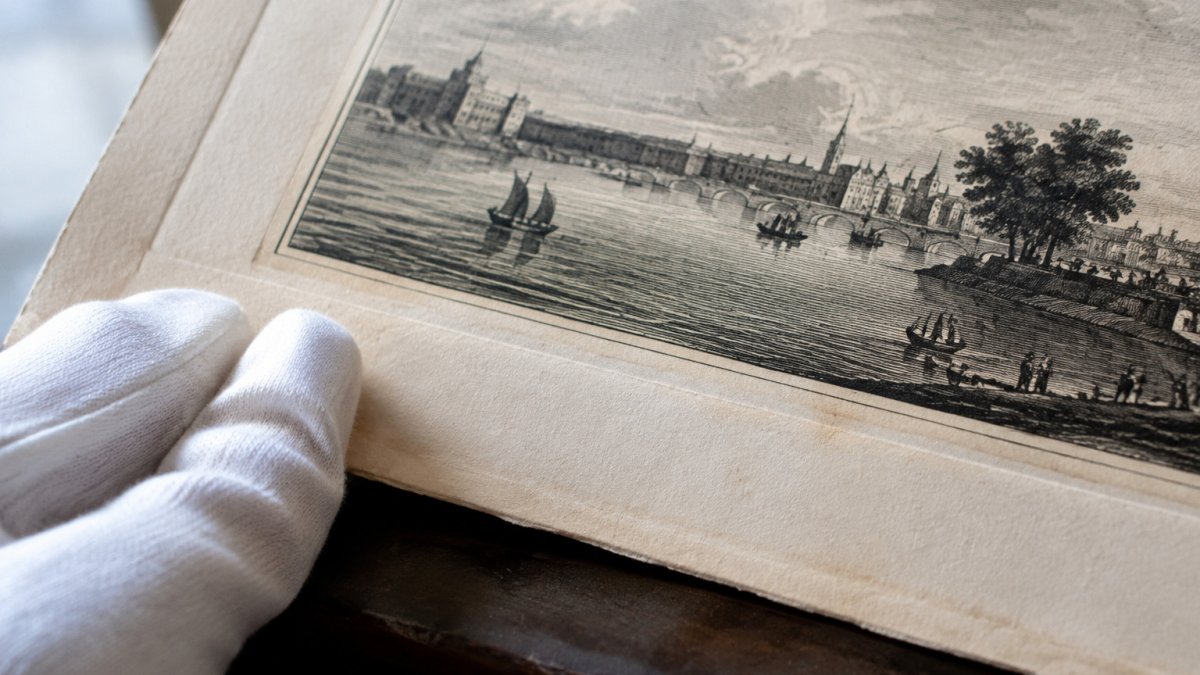
Look for a plate mark that is crisp and consistent around the image. Plate impressions on older prints typically show the slight unevenness of hand-printing, with the inked lines sitting in the paper rather than on top of it.
Be careful here, though. Some later printings and some good reproductions also show plate marks, and a plate mark alone proves only that a print was made from a plate, not when. Use it as one clue among several.
Sign 2: Handmade Paper, Laid Lines and Watermarks
Paper is often the most revealing element of an older sheet. Before about the mid-nineteenth century, most paper was made by hand on a mould with closely spaced wires. This leaves a pattern of fine parallel lines, called laid lines, and thicker chain lines running at right angles to them.
Many older sheets also carry a watermark, a design formed in the mould wire that appears as a lighter image when held to light. Watermarks can sometimes be matched to paper-maker records, which is useful for narrowing a date range.
Paper fibre is worth examining too. Handmade rag paper tends to show irregular fibres and slight variation in thickness across the sheet.
Sign 3: Age Toning, Foxing and Discoloration
Discolouration is the sign most often treated as proof of age, and the one most easily faked.
Age toning is the slow oxidation and light-driven breakdown of the paper's cellulose and residual lignin, which shifts the sheet from white or cream towards warm yellow, tan or brown.
Foxing is the small rust-to-brown spotting that develops in clusters. It is associated with iron and copper impurities in the paper, with moisture cycling, and with mould activity in humid conditions. Two things matter for assessment:
- Inactive, historic foxing is dry, flat, well-defined and stable over months of observation. It is a condition issue but not an emergency.
- Active foxing is soft-edged, spreading, sometimes slightly raised or accompanied by a musty smell and tide-line staining. That points to ongoing moisture and possibly mould, which is a conservation risk rather than a sign of age.
Artificial aging is common in the reproduction trade.
Safe at-home checks, none of which involve touching the surface with a wet finger:
- Raking light. Hold the sheet at a low angle under a lamp. Genuine toning sits in the paper; applied washes can show a faint surface film or brush texture.
- Transmitted light. Backlight the sheet on a light box or against a bright window (do not press it flat against glass). Look for the even internal colour of aged rag paper versus the patchy, surface-only look of a stain.
- Ultraviolet (UV) inspection. A handheld UV torch is inexpensive and revealing. Many modern papers contain optical brighteners that fluoresce blue-white under UV, while old rag paper typically stays dull. Repairs, later inpainting and some adhesives also fluoresce differently from the surrounding sheet.
- The cotton-swab test, with caution. Only on a blank margin, and only with a barely damp swab, a tiny amount of colour lifting can suggest a soluble applied stain rather than aged paper. Watch out: this can lift original hand colour or disturb sized paper, so if you are not experienced, skip it and let a conservator do it.
Finally, separate age from damage. Because careful condition assessment also depends on distinguishing wear from workmanship, Lil Legacy Treasures can help you consider the engraving itself alongside the paper that preserves it.
The checks below summarise how to tell genuine aged toning and foxing from artificial staining and active damage.
| Condition | What it suggests | Action |
|---|---|---|
| Even toning, edge-weighted | Genuine age-related change | Note as age characteristic |
| Mat burn band | Acidic window mount against sheet | Records framing history |
| Dry historic foxing | Stable, inactive condition | Monitor, not an emergency |
| Soft, spreading foxing | Active moisture or mould | Seek conservation advice |
| Blotchy stain, tideline | Likely artificial aging | Treat as warning sign |
| Uneven darkening of image area | Reverse of normal light exposure | Check for artificial aging |
| Musty smell, black spots | Mould activity | Conservation risk, act now |
Sign 4: Engraved Line Quality and Fine Crosshatching
Engraving was done by hand with a burin cutting furrows into the copper, and the quality of those lines is a strong indicator of the technique. Look closely at the tapered strokes, the way lines swell and thin as the burin moved, and the fine crosshatching used to build tone in shadows. Learn how to identify authentic antique prints in more depth.
Hand engraving produces lines with subtle variation. Compare etching and engraving differences to see how the two techniques leave different line marks. Mechanical reproduction, photographic plates or modern digital printing tend to produce lines that are too uniform, too even in weight, or that show dot patterns when magnified. See how to tell if an engraving is a reproduction for more detail. A magnifying glass of around 10x is enough for most of these checks.
Remember that a fine line alone does not prove age. Skilled later engravers could match earlier work, so compare line quality against other examples from the same period and publication where you can.
Sign 5: Margin Wear, Creases and Brittleness
Wear is the sign most likely to be misread, because it records handling rather than manufacture. A well-kept early print can look almost fresh; a poorly kept Victorian print can look far older than it is.
What genuine age looks like in the margins. Old rag paper was sized and relatively strong, but two centuries of handling leaves characteristic marks:
- Edge wear and 'feathering' where the sheet has been thumbed, often softened and slightly rounded rather than sharply torn.
- Original binding stubs, stitch holes and guard strips along one edge, where the plate was bound into a book or atlas. These are strong publication-history clues and should be recorded, not trimmed away.
- Folds that follow the paper's grain, usually a single central fold from a folio or a fold matching a known atlas format. A fold that sits naturally in the sheet and shows even, softened creasing is consistent with age.
- Slight cockling or 'plate ripple' around the image, where damp paper was pressed into the plate and dried under tension.
Brittleness and why it matters. As paper ages, the cellulose chains shorten and the sheet loses flexibility.
Distinguishing age from active conservation risk. Expected age characteristics, light edge wear, historic folds, stable toning, are not emergencies.
Safe handling and at-home checks.
- Work on a clean, dry surface with clean hands; cotton gloves are optional but avoid cotton lint on textured paper.
- Support the sheet on a rigid board when lifting it, never lift by one corner.
- Store flat, interleaved with acid-free tissue, in an archival box; avoid PVC sleeves and acidic boards.
- Keep away from direct sunlight, radiators and damp walls; aim for stable, moderate humidity rather than a fluctuating environment.
- Photograph and note every tear, fold, stain and repair before doing anything else, so the condition record is preserved.
Do not attempt washing, bleaching, tape removal or flattening yourself.
Sign 6: Ink, Hand Colouring and Printing Style
The ink used on an engraving and the way it sits on the paper can reveal a lot. Early intaglio prints were inked by hand and wiped, leaving ink in the lines and clean paper elsewhere. The ink often has a slightly soft, slightly raised quality rather than the flat, uniform look of modern printing.
Hand colouring is another clue. Many antique prints were coloured by hand after printing, often in watercolour or gouache. Find out whether hand colouring on an antique print is original or modern before you decide.
Printing style, such as the depth of the plate tone and the placement of the image on the sheet, should be compared with documented examples from the period.
Sign 7: Publication Details and Dating Clues
Publication details are often the most direct route to a date. Look for a printed imprint, the name of the engraver or publisher, a plate number, a date within the plate, or a caption.
Be cautious, though. Dates printed on a plate can refer to when the design was first made, not when a particular impression was pulled. Later editions often reused old plates. A date is strong evidence only when it matches the paper, the ink, and the wear in your print.
Where the publication details are missing or unclear, a specialist print dealer or appraiser can help you narrow the range.
Putting the Seven Signs Together
No single sign settles the question of age. A print with a convincing plate mark, handmade laid paper, even toning, crisp hand-cut lines, and a matching publication date is a far stronger candidate than one that passes only a single test. Conversely, a print that fails several of these checks deserves scrutiny.
When you are unsure, keep the print away from direct light and humidity, avoid cleaning or repairing it yourself, and seek an independent opinion from a qualified specialist before making a significant purchase.
Frequently Asked Questions
How can you tell if a copperplate engraving is antique?
Start with the plate mark, the faint embossed border left by the printing plate's edge, and look for a crisp, slightly raised impression of the engraved lines on the reverse. Check the paper for handmade characteristics such as laid lines and uneven deckle edges, then examine the toning and wear. No single sign proves age, so look for several consistent signs together. Where a sale involves significant money, ask the seller for provenance records and consider a professional appraisal before you commit.
What does an original copperplate engraving look like?
An original copperplate engraving has fine, tapered lines cut into a metal plate, which print as slightly raised, crisp strokes you can often feel with a fingertip. Crosshatching appears as clean intersecting lines rather than a dot pattern. Colour, where present, usually sits on top of the black line work rather than blurring it. Look for a plate mark, and compare the detail against a known reproduction if you can, since reproductions tend to look flatter and softer.
How can you tell an original print from a reproduction?
Reproductions are often printed by offset or photomechanical methods that leave a dot or halftone pattern visible under magnification, and they usually lack a plate mark. Original prints show line-based detail and paper that matches the period. Hand-colouring on an original is typically irregular, while reproduction colour is often uniform. Remember that genuine old prints can be reproduced, and that artificial ageing can imitate toning, so combine these checks rather than relying on one.